AppSheet Tutorial: Build Your First App from Scratch [2026 Beginner Guide]
AppSheet Tutorial: Build Your First App from Scratch [2026 Beginner Guide]
In 30 minutes, you'll have an App you made yourself.
No programming skills needed. No need to spend money hiring engineers.
Just a Google account and a Google Sheets file, and you can start.
This tutorial will guide you step by step. Follow along, and you're guaranteed to learn.
Introduction: Why Choose AppSheet?
Before we begin, let's understand why AppSheet is worth learning.
Three Core Advantages
1. No Coding Required
Traditional App development requires learning Swift, Kotlin, or at least JavaScript.
AppSheet doesn't.
If you can use Excel or Google Sheets, you can make an App.
2. Google Ecosystem Integration
AppSheet is a Google product.
It seamlessly integrates with Google Sheets, Google Drive, and Gmail.
If your company uses Google Workspace, adoption has virtually zero barriers.
3. Super Fast Development Speed
Traditional App development: 3-6 months.
AppSheet: Hours to days.
This isn't an exaggeration—it's true.
Want to learn more about AppSheet's features and positioning? See AppSheet Complete Guide.
What You'll Learn in This Tutorial
- Register an AppSheet account
- Prepare Google Sheets data
- Build your first task list App
- Set up field types and display options
- Test and publish the App
- Advanced tips: Conditional formatting and automation
Prerequisites
Before starting, make sure you have these things.
What Do You Need?
Required:
- Google account (Gmail works)
- Google Sheets (free)
- Computer and internet
Bonus:
- A problem you want to solve (e.g., managing to-do items)
- Basic spreadsheet experience
That's it. Nothing else needed.
Register an AppSheet Account
Step 1: Go to AppSheet Website
Open your browser and enter appsheet.com
Step 2: Click Sign In
Click "Sign In" or "Start for free" in the top right corner
Step 3: Sign in with Google Account
Select "Sign in with Google"
Using your Gmail account is most convenient.
Step 4: Authorize Access
First-time login will request authorization.
Click "Allow" to let AppSheet access your Google Drive.
After successful login, you'll see the AppSheet console (My Apps).
Now you're ready.
Your First App: Task List
We're going to make a simple task list App.
Features include:
- Add tasks
- Mark completion status
- Set due dates
- Assign owners
Step 1: Prepare Data Table
First, create data in Google Sheets.
1. Open Google Sheets
Go to sheets.google.com and create a new blank spreadsheet.
2. Name the File
Name the file "Task List"
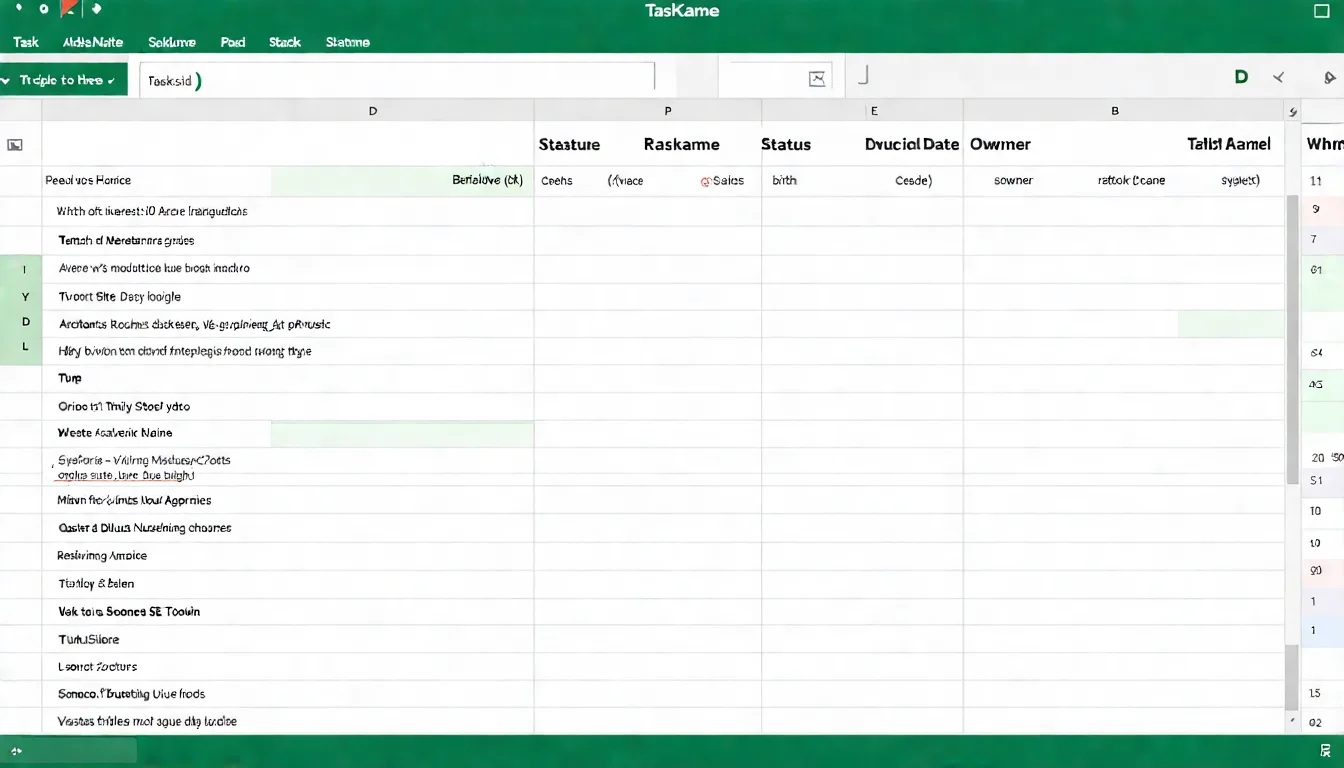
3. Create Fields
Enter the following field names in the first row:
| A | B | C | D | E |
|---|---|---|---|---|
| TaskID | TaskName | Status | DueDate | Owner |
Important Notes:
- Use English for field names to avoid issues
- Each field name must be unique
- First column should ideally be an ID
4. Add Sample Data
Starting from the second row, enter some test data:
| TaskID | TaskName | Status | DueDate | Owner |
|---|---|---|---|---|
| T001 | Complete Weekly Report | To Do | 2025-12-20 | John |
| T002 | Reply to Customer Emails | In Progress | 2025-12-18 | Sarah |
| T003 | Prepare Meeting Slides | Completed | 2025-12-15 | John |
The data table is now ready.
Step 2: Connect Data
Now connect Google Sheets to AppSheet.
1. Return to AppSheet
Open the AppSheet console (appsheet.com)
2. Create New App
Click "Create" → "App" → "Start with your own data"
3. Name the App
Enter an App name, e.g., "My Task List"
4. Select Data Source
Select "Google Sheets"
Find the "Task List" file you just created
Select the worksheet (usually Sheet1)
5. Wait for Auto-Generation
AppSheet will automatically analyze your data structure.
After a few seconds, your first App is generated!
It's still basic, but it already works.
Step 3: Set Field Types
AppSheet will automatically guess field types, but usually needs adjustment.
1. Go to Data Settings
Click "Data" → "Columns" in the left menu
2. Adjust Field Types
| Field | Recommended Type | Description |
|---|---|---|
| TaskID | Text | Unique identifier, set as Key |
| TaskName | Text | Task name |
| Status | Enum | Dropdown: To Do/In Progress/Completed |
| DueDate | Date | Date picker |
| Owner | Text | Person responsible |
3. Set Enum Options
Click the Status field, and in "Type Details" set options:
- To Do
- In Progress
- Completed
This way users can select status from a dropdown instead of typing manually.
4. Set Display Names
Each field can have a "Display Name" set:
| Field | Display Name |
|---|---|
| TaskID | Task ID |
| TaskName | Task Name |
| Status | Status |
| DueDate | Due Date |
| Owner | Owner |
This way the App interface displays friendly names.
Step 4: Set Up Views
Views determine how data is presented.
1. Go to UX Settings
Click "UX" → "Views" in the left menu
2. Set Up Main List View
Find the system-created View (usually called "Task List")
Adjust these settings:
- View type: Table or Deck (cards)
- Sort by: DueDate (sort by due date)
- Group by: Status (group by status)
3. Create Calendar View
Click "New View" to add a view:
- View name: Calendar
- View type: Calendar
- Start date: DueDate
Now you have a calendar view.
4. Adjust Card Display
If using Deck View, you can set:
- Primary header: TaskName
- Secondary header: Owner
- Summary column: Status

Step 5: Create Forms
Forms let users add and edit data.
1. Check Form Settings
AppSheet automatically creates forms.
Find "Task List_Form" in "UX" → "Views"
2. Adjust Field Order
Put the most important fields at the top:
- TaskName (Task Name)
- Status
- DueDate (Due Date)
- Owner
- TaskID (can be set to auto-generate)
3. Set Default Values
In "Data" → "Columns", you can set default values for fields:
| Field | Default Value |
|---|---|
| Status | To Do |
| DueDate | TODAY() + 7 (seven days later) |
| TaskID | UNIQUEID() |
This way when adding a task, status is automatically "To Do" and due date is automatically one week later.
4. Set Validation Rules
Ensure data quality:
- TaskName: Required
- DueDate: Valid If = [_THIS] >= TODAY() (cannot select past dates)
Step 6: Test the App
Before publishing, you must test.
1. Use Live Preview
The right side of the AppSheet editor has a live preview.
Click "Preview" to simulate the phone screen.
2. Test Basic Functions
- Add a new task
- Edit an existing task
- Change task status
- Check the calendar view
3. Phone Testing
Download the AppSheet App (iOS/Android)
Log in with the same Google account
Your App will appear in the list
4. Check Syncing
Add data in the App and check if Google Sheets updates synchronously.
It should be instant.
Step 7: Publish and Share
Once testing is complete, you can publish.
1. Click Deploy
Click "Manage" → "Deploy" in the left menu
2. Run Deployment Check
AppSheet will run automatic checks to ensure no serious issues.
If there are errors, it will show prompts. Fix them and try again.
3. Set Sharing Permissions
In "Users" set who can use it:
- Domain users: Same company Google Workspace users
- Allowed users: Specified Email list
- Public: Anyone (requires paid plan)
4. Send Invitations
Enter team members' Emails and send invitations.
They'll receive an Email and can click the link to use the App.
Congratulations! Your first App is complete.
Stuck on setup? First-time AppSheet users inevitably encounter issues. Schedule a free consultation and let us help solve technical difficulties.
Advanced Tips
Now that you've learned the basics, let's learn some advanced tips.
Conditional Formatting
Make different statuses show different colors.
1. Set Status Colors
In "UX" → "Format Rules" add rules:
Rule 1: Completed shows green
- Condition: [Status] = "Completed"
- Icon: Green checkmark
- Highlight color: Light green
Rule 2: Overdue shows red
- Condition: AND([Status] <> "Completed", [DueDate] < TODAY())
- Icon: Red warning
- Highlight color: Light red
Rule 3: In Progress shows yellow
- Condition: [Status] = "In Progress"
- Icon: Yellow dot
- Highlight color: Light yellow
This makes task status visible at a glance.
Automated Notifications
Let the App send reminders automatically.
Note: Automation features require Starter plan or above. For detailed plan comparison, see AppSheet Pricing Complete Guide.
Set up deadline reminders:
- Go to "Automation" → "Bots"
- Create a new Bot
- Set Event:
- Event type: Schedule
- Schedule: Every day at 9 AM
- Set Process:
- Find tasks due tomorrow that aren't completed
- Set Task:
- Send Email to Owner
This way every morning, owners receive reminders for tasks due the next day.
Want to learn more automation tips? See AppSheet Automation Complete Tutorial.
FAQ
What if the App is slow?
Possible causes and solutions:
| Cause | Solution |
|---|---|
| Too much data | Archive old data, keep tables lean |
| Complex formulas | Simplify Virtual Column formulas |
| Large images | Compress images or reduce resolution |
| Network issues | Check network connection |
How to share with people without Google accounts?
Free plan only shares with people who have Google accounts.
To share with external users, you need to:
- Upgrade to a paid plan
- Set "Allow all signed-in users"
- Or use public links (Enterprise plan)
Can the App be used offline?
Yes.
AppSheet supports offline mode:
- Enable in "Settings" → "Offline/Sync"
- Set which data to cache offline
- Can use without internet
- Auto-syncs when connection is restored
Will data disappear?
No.
Data is stored in Google Sheets—AppSheet is just the interface.
Recommendations:
- Regularly backup Google Sheets
- Don't delete the original data table
- Use version history feature
Can multiple people use it simultaneously?
Yes.
AppSheet supports multi-user collaboration:
- Data syncs in real-time
- Everyone sees the latest version
- Can set different permissions (view/edit)
Free plan limits 10 people; more requires payment.
Next Steps
Congratulations on completing your first App!
Continue Learning
See More Examples
Task lists are just the beginning. AppSheet can do more:
- Inventory management
- Customer visit records
- Equipment inspection
- Leave request systems
Want to see more examples? See AppSheet Examples Gallery.
Learn Advanced Features
Review Complete Features
If you have any questions, you can refer back to AppSheet Complete Guide.
Implementation Recommendations
- Start small: Make simple Apps first, add features after becoming familiar
- Solve real problems: Use it for work—motivation to keep improving
- Study examples: AppSheet's official sample library has lots of inspiration
- Join the community: Ask questions when stuck—learn faster
Need Customization Help?
Basic features can be self-taught, but complex needs may require professional assistance.
Common advanced needs:
- Complex permission controls
- Integration with company systems
- Multi-table relationship design
- Complex automation workflows
Schedule a technical consultation and let us help solve AppSheet difficulties.
References
- AppSheet Official Documentation - Getting Started
- Google Cloud - AppSheet Quickstart Guide
- AppSheet Community - Best Practices for New Users
- AppSheet Sample Apps Gallery
Need Professional Cloud Advice?
Whether you're evaluating cloud platforms, optimizing existing architecture, or looking for cost-saving solutions, we can help
Book Free ConsultationRelated Articles
AppSheet API Integration Guide: Connecting with External Systems [2026 Complete Tutorial]
AppSheet API complete tutorial: Getting API Key, REST API operations (CRUD), integration with Zapier/Make, enabling AppSheet to connect with any external system.
AppSheetAppSheet Interface Settings and Usage Tips | Complete Localization Tutorial [2026]
AppSheet localization complete tutorial, from interface language settings to App content localization, solving common issues like display problems and inaccurate search.
AppSheetWhat is AppSheet? 2026 Complete Guide | Free Start, Examples, Pricing All in One
Complete analysis of Google AppSheet no-code development platform. From basic tutorials to advanced features, including pricing plans, practical examples, and interface settings, teaching you to quickly build your own App.